How to convert your site into a Joomla 1.5 Template
This tutorial will show you how to create a simple Joomla 1.5 template. The tutorial assumes you have already created a XHTML layout for your site along with the CSS and images and that you now want to use your design with Joomla. Joomla is one of the best known Content Management Systems (CMS) around but creating a template for Joomla can be a confusing process, hopefully this insight will make it a bit easier.
Create a new directory either directly in the “templates” folder of your Joomla install or on your own computer which we will upload later on. Inside your new directory, create a file called index.php, and another named templateDetails.xml. Then create a folder named css and in it — a new file name template.css.
We now have the three files we need for the template to function properly:
index.php - Specifies module positions and the path to your external files.
templateDetails.xml - This is a system file that provides information about your template to Joomla.
css/template.css - The stylesheet file of your template.
Now, we will deal with each file in turn and look at the contents. Download the files from below or you can start from scratch.
Download Source ZIP File (2,435 bytes)
The index.php file should start with the header:
<!DOCTYPE html PUBLIC "-//W3C//DTD XHTML 1.0 Strict//EN" "http://www.w3.org/TR/xhtml1/DTD/xhtml1-strict.dtd">

                    <html xmlns="http://www.w3.org/1999/xhtml" xml:lang="<?php echo $this->language; ?>" lang="<?php echo $this->language; ?>" >

                    <head>

                    <jdoc:include type="head" />

                    <link rel="stylesheet" href="<?php echo $this->baseurl ?>/templates/your_template/css/template.css" type="text/css" />

                    </head>
The header contains information for the browser, you should use the same Doctype as your existing site and nay custom Meta tags that are applicable to the entire site. As we are going to be using a CMS most of the sites Meta tags will be handled by the PHP code <jdoc:include type="head" />. The code tells Joomla to include the header content (the page title, meta description, keywords, author, etc.) that you will edit in the administrative end of your CMS.
Next, we have to add the body of the website:
<body>

                      <jdoc:include type="component" />

                    </body>

                    </html>
The <jdoc:include type="component" /> line will display the main content of any given page. This template now only includes our articles/component without any styling or modules (navigation, footer, etc.) displayed. To add modules we add some more code to the body:
<div id="wrapper">

                      <div id="header"><jdoc:include type="modules" name="header" /></div>

                      <div id="leftcolumn"><jdoc:include type="modules" name="leftcolumn" /></div>

                      <div id="content"><jdoc:include type="component" /></div>

                      <div id="rightcolumn"><jdoc:include type="modules" name="rightcolumn" /></div>

                      <div id="footer"><jdoc:include type="modules" name="footer" /></div>

                    </div>
Here we are trying to create a page that will have a layout the same as the example template that goes with this tutorial.
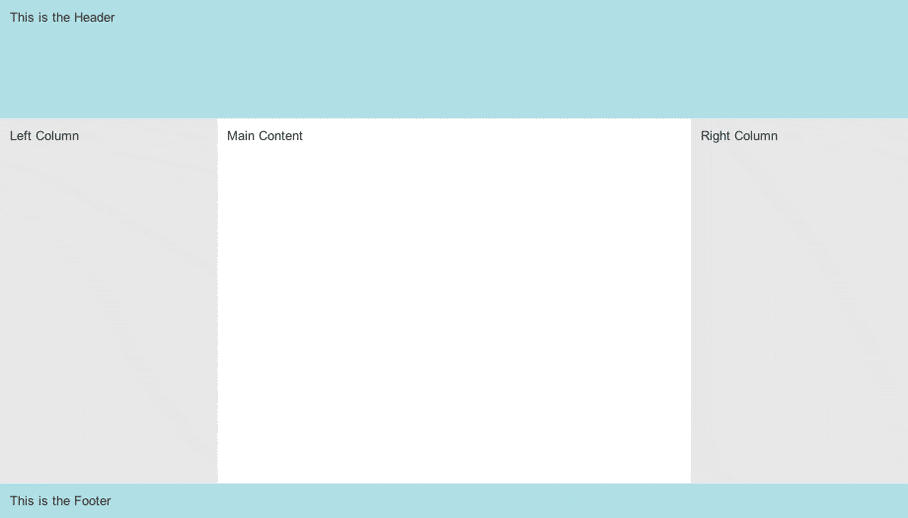
The above shows the layout of the downloadable source files form the my_template example.
The <jdoc:include type="modules" name="leftcolumn" /> line tells the Joomla application where to insert the modules published in the “leftcolumn” position. We have just added the header, leftcolumn, rightcolumn and footer positions to our template. You can use whatever names you like for your module positions.
Finally our index.php file should look something like this:
<!DOCTYPE html PUBLIC "-//W3C//DTD XHTML 1.0 Transitional//EN" "http://www.w3.org/TR/xhtml1/DTD/xhtml1-transitional.dtd">

                    <html xmlns="http://www.w3.org/1999/xhtml" xml:lang="<?php echo $this->language; ?>" lang="<?php echo $this->language; ?>" >
<head>

                    <jdoc:include type="head" />

                    <link rel="stylesheet" href="<?php echo $this->baseurl ?>/templates/my_template/css/template.css" type="text/css" />

                    </head>
<body>

                      <div id="wrapper">

                        <div id="header"><jdoc:include type="modules" name="header" /></div>

                          <div id="leftcolumn"><jdoc:include type="modules" name="leftcolumn" /></div>

                          <div id="content"><jdoc:include type="component" /></div>

                          <div id="rightcolumn"><jdoc:include type="modules" name="rightcolumn" /></div>

                          <div id="footer"><jdoc:include type="modules" name="footer" /></div>

                        </div>

                    </body>

                    </html>
Now we have to create the templateDetails.xml file. In it, paste the following lines:
<?xml version="1.0" encoding="utf-8"?>

                    <install version="1.5" type="template">

                      <name>my_template</name>

                      <version>1.0.0</version>

                      <creationDate>18 September 2009</creationDate>

                      <author>Your Name</author>

                      <authorEmail>you@yourdomain.com</authorEmail>

                      <authorUrl>http://www.yourdomain.com</authorUrl>

                      <copyright></copyright>

                      <license>GNU/GPL</license>

                      <description>Basic template for Joomla 1.5</description>

                      <files>

                        <filename>css/template.css</filename>

                        <filename>index.php</filename>

                        <filename>templateDetails.xml</filename>

                      </files>

                      <positions>

                        <position>header</position>

                        <position>leftcolumn</position>

                        <position>rightcolumn</position>

                        <position>footer</position>

                      </positions>

                    </install>
The XML files gives Joomla! the information it needs when installing your template. It’s main job it to indicate the location of the files used by the template.
Most of the fields in the XML file are self explanatory but it is worth noting that all the files your template is to install should be listed e.g. images, javascript and additional CSS files. Also the positions your template uses also need to be included or they will not appear in dropdown box in Joomla as a positioning option.
The final step is to add some styling to the template. We included a line in our index.php file to call our CSS file, its now time to add our style definitions from our original site to the blank template.css file we created earlier.
Now we have created all the bits of our template we need to create a ZIP archive from our files. To do this simply ZIP the files we have created using your preferred compression utility.
Now have a template all we need to do now is install it on our Joomla! site via the backend system. Basically all you need to do is use the universal installer to install the template (see Joomla docs How to install templates) then select our newly installed template as the default for the site (see Joomla docs How to switch templates).
Once you have your new template installed you can use the Template Manager to make further alterations to your template. Here we have assembled a very basic template and you will need some trial and error in using styling modules to match your needs.
Next time we will take a further look at developing more advanced templates. Subscribe to our RSS feed to be kept up-to-date. Why not have a look in the archives for more help with developing the HTML and CSS for your templates.
This article was posted on 18 September 2009 in Misc, Tutorials
What you have had to say about all this...
Very well done!
- ZornaThat's the end of this article. I hope you found it useful. If you're enjoyed this article why don't you have a look around the archives, where you can find some more tutorials, tips and general ramblings.
comments